
Ever wished your class notes could just… talk to you? That’s exactly what the NotebookLM Audio Overview feature does — it turns PDFs, worksheets, and web sources into a natural-sounding podcast you can listen to on your commute, in the gym, or while making dinner. 🎧
The catch? Most people click “generate” the moment they see the button, get a bland, generic result, and give up. This guide walks through every setting in order — sources, language, format, length, and guidance — so your first try sounds like it was made for you, not for everyone.
Table of Contents
What Is the NotebookLM Audio Overview Feature?
The NotebookLM Audio Overview feature reads every source you’ve selected in your notebook and turns it into spoken audio — anywhere from a quick 6-minute brief to a long-form deep dive. The output is only as good as the sources behind it, so the real skill isn’t clicking the button; it’s what you do before you click it.
💡 Pro Tip: Garbage in, garbage out still applies to AI audio. A messy source list gives you a messy podcast — even if the AI hosts sound great doing it.
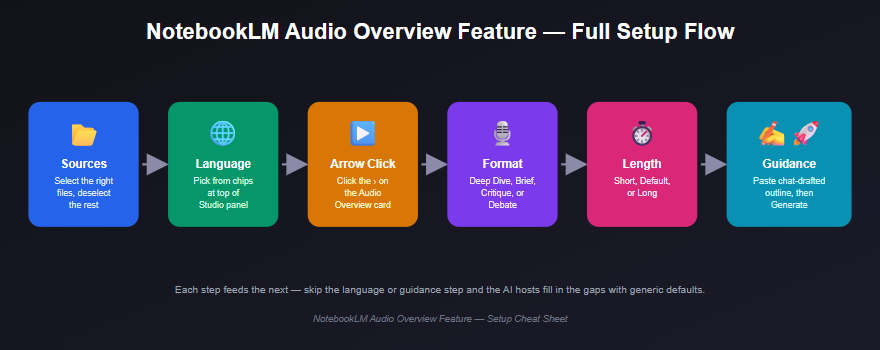
The Full Workflow at a Glance
Step 1: 📂 Choose Your Sources Carefully
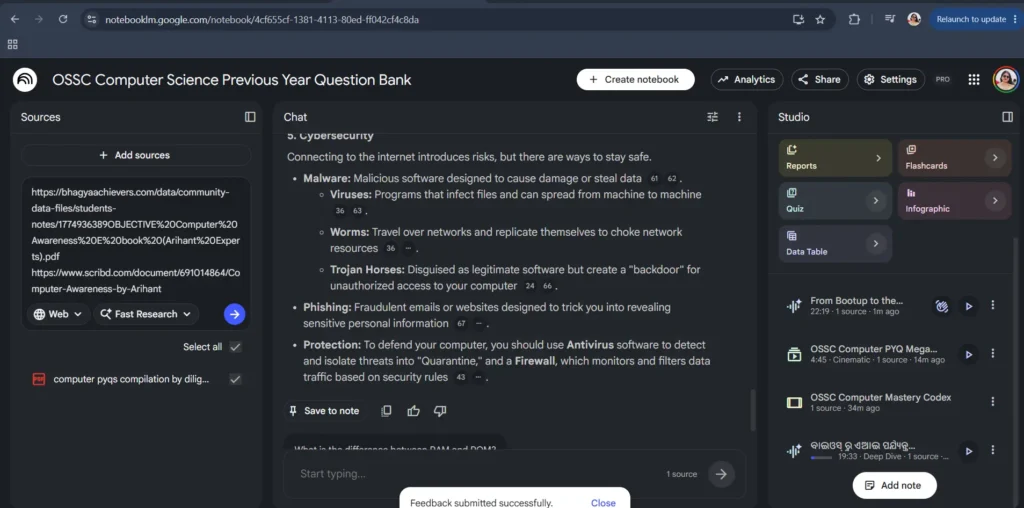
On the left panel, every uploaded source has a checkbox. Before you touch anything on the right, review what’s selected — the NotebookLM Audio Overview feature reads everything checked, not just the file you had in mind.
💡 Real example: If your lesson folder has a clean worksheet mixed in with a file containing private student notes, uncheck the second one first. Otherwise, it ends up narrated right along with your lesson.
Step 2: 🌐 Set Your Language First
Here’s the part most guides get wrong: the language picker isn’t buried in a settings menu — it sits right at the top of the Studio panel, above the NotebookLM Audio Overview feature card itself, showing chips for languages like Hindi, Bengali, Gujarati, Kannada, Malayalam, Marathi, Punjabi, Tamil, Telugu and many more regional languages included.
Pick your language before you open the format panel. Since the AI hosts generate the entire conversation in that language, changing it afterward means starting the whole overview over again.
Step 3: ▶️ Click the Arrow Button
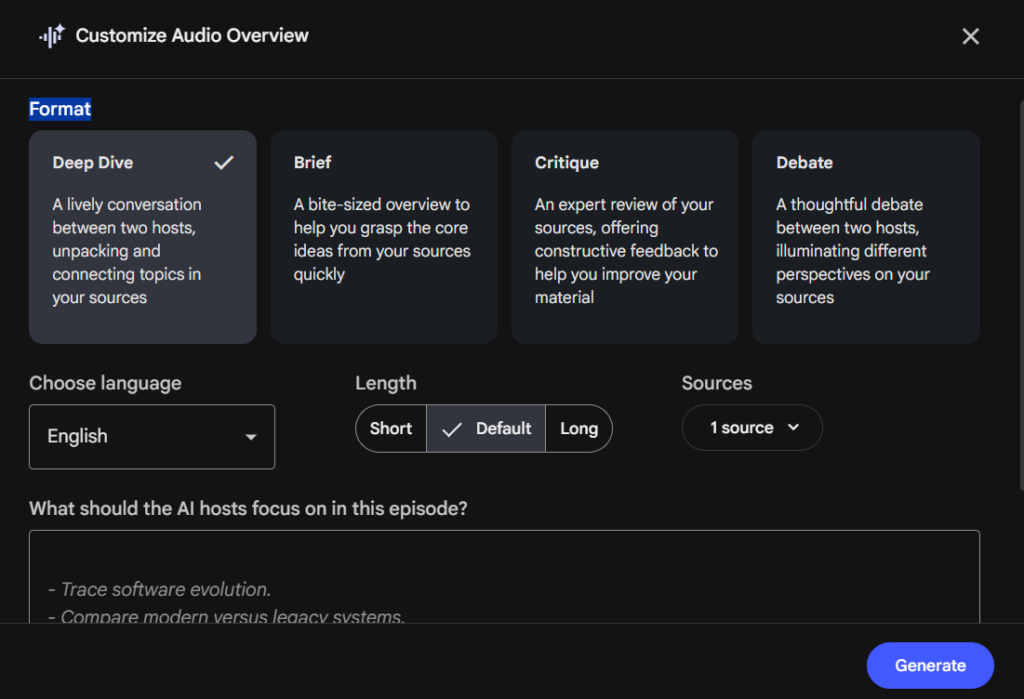
Don’t tap the Audio Overview card body otherwise it will directly generate the audio itself. Instead, click the small arrow (›) on the right edge of the Audio Overview card in the Studio panel.
That arrow is what opens the customize panel — the screen where format, length, and your guidance text actually live. Tap the card itself without hitting that arrow, and NotebookLM just generates a default version using every source you have selected.
Step 4: 🎙️ Pick a Format
| Format | What It Sounds Like | Best For |
|---|---|---|
| Deep Dive | Two AI hosts, full back-and-forth conversation | General podcast-style overviews |
| Brief | Short, single-voice summary, no banter | Quick refreshers, busy schedules |
| Critique | Reads your work back and gives feedback | Reviewing essays or research papers |
| Debate | Frames the material as two opposing sides | Contested or political topics |
Matching the format to your actual goal matters more than defaulting to Deep Dive out of habit.
Step 5: ⏱️ Set the Length
| Length | Runtime | Best Use Case |
|---|---|---|
| Short | ~1–1.5 minutes | Young learners, quick recaps, short attention spans |
| Default | ~15 minutes | Standard topic overviews |
| Long | Extended | Dense research, technical training, in-depth review |
Step 6: ✍️ Add Custom Guidance (Let the Chat Tool Draft It)
Below format and length is a guidance text box — and you don’t have to write it yourself. Ask NotebookLM’s chat to draft an outline first, since it already understands everything in your sources.
Try something like: “Give me an outline for the audio overview to generate a short podcast about a historical figure’s life, made friendly for fifth-grade age students.” Paste the result into the guidance box before generating. Skipping this step is the single biggest reason audio overviews come out generic.
Step 7: 🚀 Generate and Download
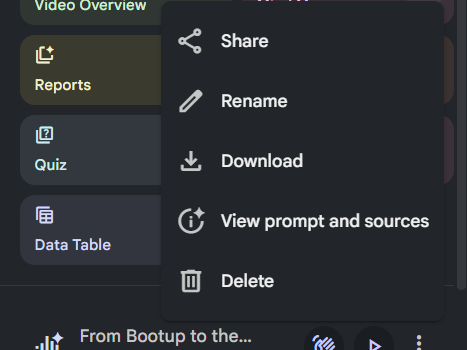
How to Download ?
With sources, language, format, length, and guidance all set, hit generate. Longer formats take a few extra minutes to process. Once it’s ready, click on the right hand side three dotted line → You can found these options there (Share, Rename, Download, View Prompt & Sources, Delete). Download the audio file and use it anywhere a normal recording works — in class, on a commute, or inside a training module.
🎁 Bonus: Studio Isn’t Just Audio Anymore
The same Studio panel that houses the NotebookLM Audio Overview feature now also builds several other outputs from your sources:
| Tool | What It Creates |
|---|---|
| Slide Deck | An auto-generated presentation from your sources |
| Video Overview | A narrated video walkthrough |
| Mind Map | A visual map of key concepts |
| Reports | Written summaries and study guides |
| Flashcards | Quick-review question-and-answer cards |
| Quiz | Auto-generated practice questions |
| Infographic | A visual one-page summary |
| Data Table | Structured tabular extraction from your sources |
If you’re building study material, it’s worth generating a Mind Map or Flashcards alongside your audio overview — same sources, several formats. If you want to read more about NotebookLM read our blog – NotebookLM for Research Papers: 7 Proven, Powerful Tips
📱 Practical Example 1: Turning a Source Into a YouTube Short
Here’s a use case that goes beyond audio entirely: you can turn the same sources you’d use for the NotebookLM Audio Overview feature into a ready-to-post YouTube Short — no camera, no editing software, no voiceover recording.
Say a creator uploads a research paper or a set of notes and opens Short Video Overview instead of Audio Overview in the Studio panel. NotebookLM generates a 9:16 vertical clip, roughly 60 seconds long, built the same way TikTok and YouTube Shorts are framed — one hook, one idea, one takeaway, grounded entirely in the uploaded source rather than generic stock footage.
💡 Pro Tip: Because the short is capped at about a minute, it works best when your source has one strong, clear point to lead with. Feed it a whole textbook and it will still pick just one takeaway — so upload a focused source if you want the short to land on the point you actually care about.
Once it’s generated, download the clip and upload it directly to YouTube Shorts, Instagram Reels, or TikTok — the same source material that built your long-form audio overview now has a second life as a scroll-stopping vertical clip.
🎓 Practical Example 2: Long-Form NotebookLM Audio Overview Feature for College Research
A student who just finished a research paper uploads it as the only source, sets the format to Critique instead of Deep Dive, and selects Long so the AI has room to unpack every section. The result is a full audio review they can listen to on the bus — catching structural gaps the way a professor might in office hours.
✅ Quick Recap
- 📂 Select only the sources you want included.
- 🌐 Pick your language from the chips at the top of Studio — before you generate.
- ▶️ Click the arrow on the NotebookLM Audio Overview feature card — never the card body.
- 🎙️ Choose a format: Deep Dive, Brief, Critique, or Debate.
- ⏱️ Set length: Short for quick recaps, Long for dense material.
- ✍️ Let the chat tool draft your guidance, then paste it in.
- 🚀 Generate, download, and reuse anywhere audio works.
Why the NotebookLM Audio Overview Feature Matters for Learning
Teachers or any fellow can turn stale lesson plans into podcast-style episodes. Students can turn their own notes into audio for test prep on the go. And anyone who’s sat through a monotone college lecture knows how much better that content would land as an audio conversation instead of a wall of text.

3 thoughts on “7 Ways to Master the NotebookLM Audio Overview Feature”